PHOTOSHOP WORKSHOP.
SESSION 1.
When first opening your document you have to ensure that the pixel/inch ratio is set to 300. This is the investigated proportion to which the human eye cannot register the individual pixels in an image.
NEW DOCUMENT OPTION BOX
There are 2 main colour settings on photoshop, these are RGB or CMYK. They reproduce to totally different ranges in colour. We leave the image as RGB because while we are working on it, it is on a screen. CMYK is the colour palette setting you need to use when printing.
DROP DOWN OPTION BOX FOR COLOUR SETTINGS.
When you first open a photograph, it should already be in the RGB mode. However to check you can use this 'image' drop down box.
DONT WORK IN A DESTRUCTIVE WORK FLOW, OTHER WAISE YOU WONT BE ABLE TO REDEEM YOUR ORIGINAL IMAGE.
whn you change the image to CMYK it can alter the colours of the original image.
LEFT- RGB
RIGHT - CMYK
GAMUT - colour range
colours highlighted are out of CMYK range. to fix this you create an adjustment layer. this allows yo to work on the image without destroying the original image.
FILL AND ADJUSTMENT LAYER ICON.
The adjustment layer is like a duplicated layer of the original image.
LAYER MASK (WHITE BOX)
* * * * * * *
6TH DECEMBER 2012
OUGD405
PHOTOSHOP WORKSHOP.
SESSION 2.
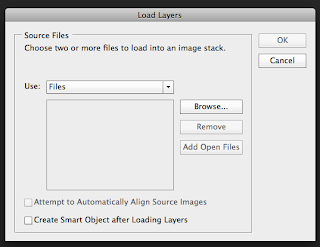
To open up multiple images you first go to the top toolbar.
Click browse to find and upload your images to the load layers tool.
Creating a smart object with the option below this creates a vector image which allows you to work on the image with out destroying the original.
This collapses all the images into one layer called a smart object. The software then takes everything from the images that is not common and get rid. In this image it is the people that have been removed.
Because the loads in the sky are different in every picture, after the file stack method the clouds have been blurred and don't look very nice. To adjust this you can go back to the folder with all the original images in it and choose one that has a nice sky. open this chosen photo in photoshop, ctrl-A and ctrl-C and paste this image into your smart object file.
Use this 'quick selection' tool, click and hold down while selecting the sky.
Then use it 'inverse option so the aspects of the image you haven't selected is now selected. Click delete and the smart object layer will come through from underneath replacing the image with people to the image that is empty.
BEFORE.
AFTER.
* * * *
PDF = PORTABLE DOCUMENT FORMAT.
saving images as a PDf allows you to create a double-sided document.
First open up you images in photoshop as this allows you to save the image as a TIFF file which will then allow you to create a double-sided PDF that can be printed.
Once you have saved your TIFF files, open up Adobe Acrobat Pro and select 'Combine files to PDF'
A box opens up in to which you can drag you TIFF images.
Make sure you create the file in a large size because you well want to print this document. Then click OK.
Once you have created your double-sided PDF file, to print it you need to ensure the settings are correct. Make sure the two-side box is ticked and that you select the 'Long-edge binding' so you back image is not upside down too the front.


No comments:
Post a Comment